
Outpost Packet Message Manager
HOW-TOs
The Outpost program does not include any online help. Instead, a series of HOW-TO files are provided with the application and are available on-line here. See the Outpost Users Guide for other details.
Acknowledge Read, Send Automatically
INTRODUCTION
I received feedback from EOC Packet Operators that packet messages are not acknowledged in a timely manner.
These requests to the EOC clog the voice channel with unnecessary traffic.
To address this, the EOC Packet Operator can now set up Outpost to Auto-Read Acknowledge all messages received, regardless of whether a READ RECEIPT was requested from the originator. This return message will be in the same format and will be handled similarly to the originator-initiated Read Request Receipts.
HOW TO
To turn on Auto-Read Acknowledge, proceed as follows:
- From the Outpost main menu, select Tools > Message Settings.
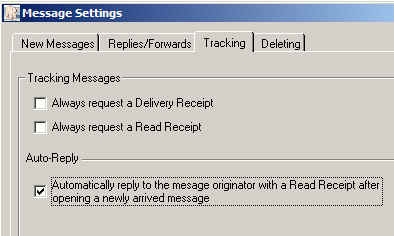
- Click on the Tracking Tab.
- In the Auto-Reply section, check the "Automatically reply..." box.
-
Press OK when done. This setting is saved and will be used until you uncheck this box.
- Now, the first time you open any received message, Outpost create a READ RECEIPT message. This message will be sent the next time the Outpost Send/Receive Session runs.
Connecting to a local KPC3/ KPC9612 PBBS
INTRODUCTION
Most TNCs come with a personal mail box (PBBS) feature that allows you
to leave local messages for other users to pick up later. For this HOW TO,
local refers to the TNC that's
connected to the end of the Serial (or USB-to-Serial) cable plugged into
your PC and is also enabled as a PBBS.
Its assumed that you have already read your TNC manual, have enabled your local mail box, and manually connected to it to confirm it works the way you expect it to work. If you have not done this, do not proceed with this HOW TO.
Connecting to this local PBBS uses all the same TNC and BBS commands that you would use if you were connecting to it by an RF path.
HOW TO
To connect to the local KPC PBBS, proceed as follows:
- Confirm the name of the PBBS. Using Outpost's interactive packet
program (or some other packet program), check the name of this PBBS with
the following command.
NOTES
Because you are connected by a serial (or USB) cable, the send/receive
session will
go by fast. If you need to confirm that it worked correctly, select Tools > Log
Settings, and select "Send/Receive Session Window logging". Then
review the file "logs\transactionsyymmdd.log" for a list of what went
on.
While this HOW TO is specific for the KPC3 and KPC9612 TNCs, it has not been verified on any of the KAM TNCs. Please let me now if you have confirmed that the above applies to them as well.
Connecting to a local MFJ-127Xx PBBS
INTRODUCTION
Most TNCs come with a personal mail box (PBBS) feature that
allows you to leave local messages for other users to pick up later.
For this HOW TO, local refers to the TNC that's
connected to the end of the Serial (or USB-to-Serial) cable plugged into
your PC and is also enabled as a PBBS.
Its assumed that you have already read your TNC manual, have enabled your local mail box, and manually connected to it to confirm it works the way you expect it to work. If you have not done this, do not proceed with this HOW TO.
NOTE! Connecting to a local MFJ-127X PBBS uses a DIFFERENT connect command than you would use to connect by an RF path. Additionally, this PBBS uses a DIFFERENT disconnect command after you have connected locally. You can either (i) create 2 TNC configurations, one for using the TNC to connect to any remote BBS, and another configuration to connect to the local PBBS, or (ii) use one configuration, and remember to change the connect command depending on to what you intend to connect. For this example, we will use 2 TNC configurations.
HOW TO
To connect to the local MFJ-1270x PBBS, proceed as follows:
- Confirm the name of the PBBS. Using Outpost's interactive packet
program (or some other packet program), check the name of this PBBS with
the following command.
 cmd:
<command unknown>
cmd:
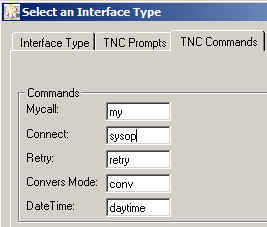
<command unknown>On the Settings > TNC > Tab 3 (TNC Commands), change the Connect command to "SYSOP" .
Press OK when done.
 Set up the PBBS. See
the HOW TO for Setting up a BBS for details, but
make the following change.
Set up the PBBS. See
the HOW TO for Setting up a BBS for details, but
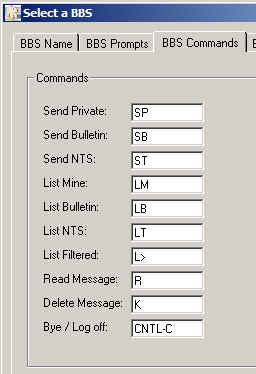
make the following change. On the Settings > BBS > Tab 3 (BBS Commands), change the Bye/Log off command to "CNTL-C".
Press OK when done.
NOTES
Because you are connected by a serial (or USB) cable, the send/receive
session will
go by fast. If you need to confirm that it worked correctly, select Tools > Log
Settings, and select "Send/Receive Session Window logging". Then
review the file "logs\transactionsyymmdd.log" for a list of what went
on.
This HOW TO has not been verified with any MFJ-1270x TNCs. Please let me now if you have confirmed that the above instructions work.
Connecting to a local PK-232/DSP-232 PBBS
INTRODUCTION
Most TNCs come with a personal mail box (PBBS) feature that
allows you to leave local messages for other users to pick up later.
For this HOW TO, local refers to the TNC that's
connected to the end of the Serial (or USB-to-Serial) cable plugged into
your PC and is also enabled as a PBBS.
Its assumed that you have already read your TNC manual, have enabled your local mail box, and manually connected to it to confirm it works the way you expect it to work. If you have not done this, do not proceed with this HOW TO.
NOTE! Connecting to a local PK-232/DSP-232 PBBS uses a DIFFERENT connect command than you would use to connect by an RF path. You can either (i) create 2 TNC configurations, one for using the TNC to connect to any remote BBS, and another configuration to connect to the local PBBS, or (ii) use one configuration, and remember to change the connect command depending on to what you intend to connect. For this example, we will use 2 TNC entries.
HOW TO
To connect to the local PK-232/DSP-232 PBBS, proceed as follows:
- Confirm the name of the PBBS. Using Outpost's interactive packet
program (or some other packet program), check the name of this PBBS with
the following command.
cmd: MYMail
- Set up the TNC for accessing a remote BBS. There is nothing special
with this step. See the HOW TO for Setting up
a TNC for details. Use all the default commands that come with
the initial TNC setup.
 Set up the TNC
for accessing the local PBBS. See the HOW TO for Setting
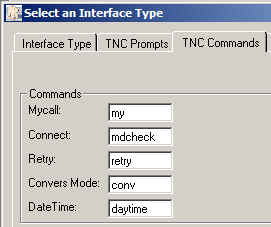
up a TNC for details, but make the following change. On the
Settings > TNC > Tab 3 (TNC Commands), change the Connect command
to "MDCHECK" (can also be abbreviated as "mdc"). Press OK when done.
Set up the TNC
for accessing the local PBBS. See the HOW TO for Setting
up a TNC for details, but make the following change. On the
Settings > TNC > Tab 3 (TNC Commands), change the Connect command
to "MDCHECK" (can also be abbreviated as "mdc"). Press OK when done.
- Set up the PBBS. See the HOW TO for Setting up a
BBS for details. Use all the default commands that come with the
initial BBS setup.
- Press Send/Receive. Verify that Outpost connects and processes messages with the local PBBS.
NOTES
Because you are connected by a serial (or USB) cable, the send/receive
session will
go by fast. If you need to confirm that it worked correctly, select Tools > Log
Settings, and select "Send/Receive Session Window logging". Then
review the file "logs\transactionsyymmdd.log" for a list of what went
on.
While this HOW TO is specific for the PK-232 and DSP-2332 TNCs, it has not been verified on the PK-88 TNC. Please let me now if you have confirmed that the above applies to them as well.
INTRODUCTION
This HOW TO describes how to create a message.
HOW TO
To create a message, proceed as follows:
-
From the main Outpost Window, click on the New button. A new message window will open.
The “BBS:” and “From:” fields are pre-loaded with the current system information.
These can be changed as necessary.
-
Enter the To: (Destination) call sign. Pressing the Tab key
will move you to the next field.
NOTE on Telpac: When sending messages via Telpac stations, multiple address destinations are supported and can be entered when separated by a comma or semicolon. Additionally, internet email addresses can be entered, but must be prefaced with SMTP:. As an example, the following is a destination (To:) line with different addresses:

Telpac Example
NOTE: If you enter multiple addresses destined for a non-Telnet BBS, Outpost will send the message to the first station listed, and issue a notification that the message was not sent to the other addressees.
- Enter the Subject. Press Tab to move to the Message Area.
- Enter the message. Outpost will wrap any text that reaches the right side of the form.
If you are sending the message to another Outpost station, the word-wrap is handled correctly and all formatting is preserved.
However, for non-Outpost users, the message may not look as “neat” at the receiving end due to limitations of the receiving program and its ability (or inability) to handle line wraparounds.
- Verify the message type. From the Actions Menu, set the message type (Private, NTS, or Bulletin) if you want something different from the default message type.
The message type is also displayed in the highlighted area below the Tool Bar buttons.
NOTE: By pressing NTS, the NTS Message Maker form will be displayed. Any message previously composed in the message form will be overwritten with the NTS message.
- When you are done with your message and satisfied that it is the way you want it to look and read, press the
Send button. The message is written to the Out Tray and will be
sent during the next Send/Receive Session.
- If you are not done, you can press the Save button. The message is placed in the Drafts folder where you can retrieve, edit, and send it at a later time.
Forwarding/Replying to a Message
INTRODUCTION
Messages that you receive can be forwarded to a different user, or replied back to the originator.
Outpost helps with the formatting so that the original message can be referenced.
HOW TO FORWARD
After opening a message from the In tray for viewing, you can press Forward.
This action does the following:
- Creates a new copy of the message and reformats it with an "original message" header.
The original message is preserved.
- The From: field is set to the current Station Call Sign.
- The To: Field is cleared and should be set to the station to receive this message.
- The user can now add or edit the text message as appropriate.
- Press Send when done.
HOW TO REPLY
This command operates exactly the same as the Forward with the following exception:
- The From: and To: fields of the original message are swapped so that the message will be sent back to the originator.
NOTE: For Telpac messages received with multiple individuals on the To: field, a Reply-to-All button is also enabled that allows you to send the reply back to everyone on the original distribution list.
CONSIDERATIONS
The Forwarding and Replying feature does add text to the message that (i) may not always be needed, and (ii) consumes channel bandwidth.
This should be of particular concern if the packet channel is heavily used.
If you need to reply to a message, consider editing the original message of unnecessary text to reduce the message bulk, provided you do not alter the meaning you want to communicate. Your organizational policies on handling Forwards and Replies should be considered.
When replying or forwarding a message, the message type is set according to the Message Settings found at Tools > Message Settings. Regardless of the setting, you can override this setting from Actions Menu by setting the message type as described above (Private, NTS, or Bulletin).
Outpost supports all 3 modes of navigating to a BBS… direct connect, connection through a digipeater station, and now access by KA-Nodes and Netrom (BPQ Packet Switch) nodes.
INTRODUCTION
Outpost will manage the sequential connecting to each KA or Netrom node along the network chain to the BBS. For this to work, Outpost needs to know 4 things:
- Intermediate Station Node Name: This is the station name of a node in the chain.
It could be a Call Sign, Call Sign with SSID, or Alias.
- Successful Connect Message: This is some or all of the text string that the KA or Netrom node will return when a successful connect is made to this node.
- Port Number: Some nodes have the ability to access several ports,
usually on different frequencies or bands. This parameter indicates the port that Outpost should use to get to the NEXT node or
BBS from this node.
- Unsuccessful Connect Message: This is some or all of the text string that the KA or NET/ROM node will return when a connect attempt to the next node is unsuccessful.
HOW TO
See the Application Note on Setting up KA and Netrom
network access for a more detailed discussion on this topic.
- Do not even try to implement this without manually verifying the path to the BBS.
Using the Outpost Interactive Packet Window (Tools > Interactive
Packet), manually connect to the BBS through each node. Record the node name, what the node returns indicating a successful connect, and
the port number for the next node.
It may be difficult to determine the unsuccessful connect message; use the default message described above, or force an error by putting in a non-existent next
node station name.
- Once you have confirmed the path, in Outpost, go to Setup > BBS.
Set up the BBS
name as usual.
- On the 4th tab (BBS Path), select KA-Node/Netrom access. Press the "Create/Update Path" button.
- Enter the first node's information in the fields provided.
- For the second node, press the "Add" button. All fields are cleared and you should enter the next node.
- When done, press OK.
- When ready, press the Send/Receive button from the Outpost Main Menu. Verify Outpost connects to the nodes in the order they are listed, and then connects to the BBS.
NOTES
Again, see the Application Note on Setting up KA and Netrom
network access for a more detailed discussion on this topic.
As with all key-stroke automation, carefully executing and recording the steps to the remote BBS is critical to a successful implementation, and ensures you have confirmed the Path integrity.
In short, it is imperative that you verify that the path really exists. The best way to do this is to manually perform the connection process (Outpost's Interactive Packet Window programs, Hyperterm, etc) to confirm that all stations are there. Record their return messages during this process.
For long distances, some stations may be fine during the daytime, but become marginal or unreachable at night. This is true regardless of the number of nodes between you and the BBS.
INTRODUCTION
This feature allows you to pick a .wav file to be played each time a new message is received.
A sound card is required for this to work. With this option turned on, the radio room staff can attend to other EOC activities and hear when a packet message arrives at Outpost.
Two .wav files are included with Outpost:
- Sound38.wav - a very "obnoxious" sound that will definitely get everyone's attention.
- incoming.wav - an announcement that states: "Attention: incoming packet message." This is less intrusive, but requires the volume to be turned up to be heard above what could be a noisy EOC.
Essentially, you can use any .wav file found on your system, or you can create your own. The "incoming.wav" file was created using the Microsoft "Sound Recorder" program that comes standard with Windows.
HOW TO
To turn on annunciations, proceed as follows:
- From the Outpost main menu, select Tools > Send/Receive
Settings. Click on the Receiving Tab.
- Click on the "Play this sound... " box, then use the browse button to select your .wav file.
- Once selected, press the Test button to verify this sound works for you.
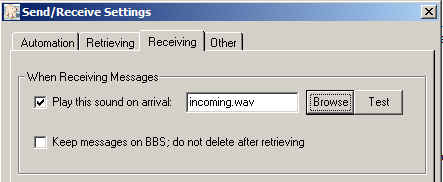
- Press OK when done. This setting is saved and will be used until you uncheck this box.
- Then, whenever Outpost retrieves a message, this .wav file will be played.
- In the event you do not have a sound card installed, you will hear a "beep" instead.
INTRODUCTION
It is good operating practice (if not required by your organization) that all messages be uniquely identified so they can be subsequently referenced.
This Outpost option automatically places a message identifier in the subject line of a message.
HOW TO
 To automatically add a message number to the subject line, do the following:
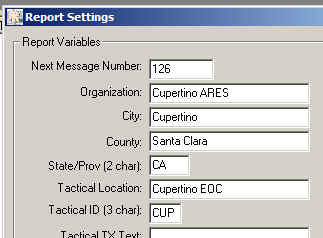
- From Outpost’s menu, select
Tools > Report Settings.
- Verify the “Next Message Number” field is set to the first number
that you want to start your message numbering.
- Verify the “Tactical ID” field is set to any special 3-character string identifier you may be using.
This field is Optional.
- Press OK when done.
- From Outpost’s menu, select Tools > Message Settings.
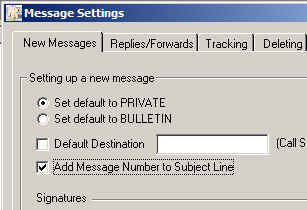 Click on “Add Message to Subject Line” option.
- Press OK when done.
EXAMPLE...
In Santa Clara County CA, “CUP” is the 3-character designation for the City of Cupertino.
Suppose the Message Numbering option is enabled and the Report Settings form is filled in as
shown above:
Then, the next time a new message is created, Outpost automatically places a message identifier in the subject line in the following format:
 <tactical id><next message number>:
So, assuming the above report settings, the following is the result the next time a message is created:
At this point, the user can enter additional subject line text following the identifier. In Santa Clara County, the combination of the Tactical ID and the Message Number ensures a sufficient level of message uniqueness for the County EOC.
The next message created after the above message would have the Message ID of “
CUP127: ”If the Tactical ID is left blank, then only the number will be inserted onto the Subject Line.
INTRODUCTION
Users that send messages to other Outpost users can request a return acknowledgement that their message was delivered and/or read.
This feature will only work if the receiving station is also running Outpost v1.3 or
greater.
HOW TO
A Delivery or Read Receipt can be set up in 2 ways:
 Set up for all messages.
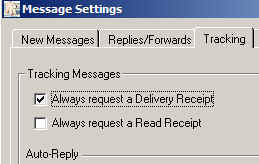
From the Outpost Main Menu, select Tools > Message Settings. Under the "Tracking" tab, click on either or both settings. At this point, all messages will have these settings applied.
OR...
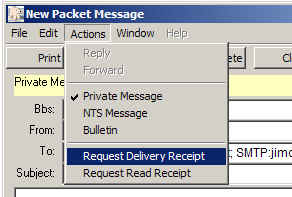 Set up the current message. Create a new message. Select Actions, then "Request Delivery Receipt" or Request Read Receipt" or both.
These settings can also override any global receipt requests that
were set up for all messages (#1 above).
Set up the current message. Create a new message. Select Actions, then "Request Delivery Receipt" or Request Read Receipt" or both.
These settings can also override any global receipt requests that
were set up for all messages (#1 above).
- Send the message as usual.
- When a message with a "Delivery Receipt Requested" is retrieved by the receiving Outpost station, a Delivery Receipt message will be generated automatically during the same Send/Receive Session in which the message was downloaded, and sent back to the originator.
- When a message with a "Read Receipt Requested" is opened by the receiving Outpost station, a Read Receipt message will be generated automatically and sent back to the originator the next time the receiving station station initiates a Send/Receive Session.
- When you retrieve your messages, separate Delivery Receipt and Read Receipt messages will be returned to you. Their subject lines will be prefaced by the words "DELIVERED: ..." or "READ: ...", and the message will briefly state that the message was delivered or read at the date and time that the receipt action took place.
INTRODUCTION
ARES/RACES organizations generally submit reports in a standard format.
Outpost includes a message processor that can take a predefined report template, make variable substitutions, and prompt the user for
entering data at specific locations on the report.
HOW TO
To set up and use Online Reports, do the following:
- Create the report. Reports are created using a text editor such as Notepad, Wordpad, MS-Word, or any other editor. Include tags where automatic substitutions are needed. Tags are text variables that, at report processing time, are substituted for pre-defined values. The following is the list of tags that Outpost supports:
TAGS Description
------------ -----------------------
<D>, <date1> Date. The current system date, mm/dd/yy.
<date2> Date. The current system date, dd-mmm-yyyy.
<T>, <time> Time. The current system time, hh:mm (24 hour format).
<M>, <msg#> Message Number. The next message number to be assigned
<C>, <call> Call. The currently defined Station ID.
<name> Operator Name. The name of the owner of the Station ID.
<bbs> BBS. The currently selected BBS name.
<subj>text Subject Line. Puts "text" in the Subject Line
<org> Organization. The organization at the sending station
<city> City. The City name.
<county> County. The County name.
<state> State. The 2-character representation of the state.
<province> Province. The 2-character representation of the Province.
<tacloc> Tactical Location.
<tacid> Tactical ID. A 3-character identifier
<text1> User-defined field.
<text2> User-defined field.
<text3> User-defined field.
- Insert Prompts ("=" the equal sign) where you want the user's input.
- Insert Comments ("/") as needed.
- Save the report as a TEXT File (file_name.txt) to a reports directory (such as C:\Data\Reports, or
c:\Program Files\Outpost\reports, or somewhere else).
- Update the Directory Settings. Go to Outpost Main, Tools > Directory
Settings. Fill in the directory name where Reports are found.
- Update the Report Settings. Go to Outpost Main, Tools >
Report Settings. Fill in the blanks for the different report
parameters.
- Process a report. From Outpost, Press New. Then, select File > Load Report. Choose the report file to use. Press
OK
- At this point, all tags automatically will be updated with the Report Settings.
The Cursor will be positioned at the first prompt. Type in the requested information.
Press CNTL-TAB or Right Mouse-Click to progress to the next prompt.
- See the additional report controls:
File > Process a report. This restarts processing if you stopped for any reason.
File > Clear remaining prompts. This removes any prompts that you don't need to be filled in.
- When done, press Send.
Sample Online Report Form
In the following example. Note the use of <tags>, comments (/), and prompts (=).
/************************************************
/ Author: Jim KN6PE
/ Rev Date: 29-May-2004
/************************************************
<subj>ARC DSR 5972
/
SINGLE UNIT DAMAGE ASSESSMENT REPORT
------------------------------------------------------
DATE/TIME: <D>, <T> Message Number: <tacid><msg#>
JURISDICTION: <city>, <state>
SUBDIVISION: =
PROPERTY TYPE: =
DAMAGE->(DESTROYED, MAJOR, MINOR, AFFECTED): =
DAMAGE DESCRIPTION:
=
NUMBER OF PEOPLE AFFECTED: =
ADULTS: = CHILDREN: =
HANDICAP: = ELDERLY: =
NUMBER OF CONFIRMED INJURIES: =
NUMBER OF CONFIRMED DEATHS: =
OPERATOR: <name> <C>, <org>
LOCATION: <tacloc>
AR
---- End of message ----------------------------
Printing Messages Automatically
INTRODUCTION
This feature helps Emergency Response Teams quickly distribute messages to the EOC or Operational Staff.
Along with the ability to automatically print a message immediately on its arrival, Outpost now lets you print messages
once they are sent.
Additionally, for those organizations that need multiple copies, a "print count" option for both print functions is provided.
HOW TO
To automatically print a sent or received messages, do the following:
- From the main Outpost menu, select File
> Print Setup.
- Verify that a printer is available and the correct printer is selected for message printing.
- Press OK when done.
- From the main Outpost menu, select Tools
> Send/Receive Settings.
- Select the "Other" Tab.
- Check the "Print received messages" box.
Select the number of copies you want.
- Check the "Print sent messages" box.
Select the number of copies you want.
- Press OK.
NOTE: If a printer is not defined and listed in the above check-box text, and printing is attempted, an error will occur. Repeat steps 1 through 3 to correct the problem.
After setting up the above, all sent and/or received messages will be printed to the named printer.
Retrieving Messages Automatically
INTRODUCTION
This feature supports unattended Outpost operation thereby allowing the EOC
radio room staff to focus on other critical activities.
Only a periodic check for new messages is required.
If message annunciation is turned on, the operator needs to check Outpost
only when a new message is
announced as having arrived.
Outpost offers 2 means for automatic polling of the BBS:
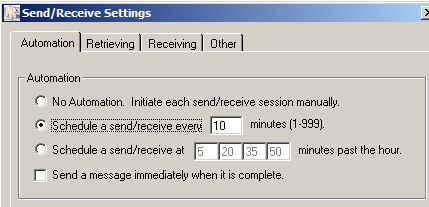
- Interval Time. The operator selects the number of minutes that they want Outpost to initiate a Send/Receive Session. The range of interval times is from 1 to 999 minutes (about 16 and a half hours).
- Slot Time. The user can select up to 4 absolute times during the 60 minutes of a hour when Outpost will run. This feature supports the collaborative nature of allowing "slots" of BBS access to be assigned to a number of Outpost users within a packet network. This feature is best used when a group of Outpost users operating on the same channel need access to the same BBS, and they work together to pick
their individual slot times. If designed correctly, Slot Timing should significantly reduce the amount of collisions between competing packet stations.
HOW TO
To set up to automatically send and receive messages, do the following:
- From the main Outpost menu, select Tools
> Send/Receive Settings.
- Under the "Automation" section, check either the Interval
Time or Slot time option. Select NONE if no automation is required.
- For Interval Time, enter a value between 1 and 999
(in minutes).
- For Slot Time, working with your packet net coordinator, enter
from 1 to 4 times representing the minutes past the hour when you want Outpost to initiate a Send/Receive session.
- Press OK.
A Send/Receive Session will kick off either every # of minutes for Interval Timing, or on the minutes past the hour for Slot Timing.
COMMENTS ABOUT USING SLOT TIMES
The need to coordinate and plan the times is critical to get the most benefit from the Slot Time feature. Suppose you are 1 of 5 stations accessing the BBS. You may be assigned slot times 0, 15, 30, and 45. Station "B" may be assigned slot times 3, 18, 33, and 48,
and so on. For instance:
------- minutes past the
hour-------
Station| Slot 1 Slot 2 Slot 3 Slot 4
------------------------------------
K6ABC | 0 | 15 | 30
| 45
K7DEF | 3 | 18 | 33 |
48
W0GHI | 6 | 21 | 36 |
51
: | |
| |
W1JKL | 12 | 27 | 42 |
57
Slot Time assignments will depend on the number of Outpost clients to be coordinated and the amount of anticipated traffic. The times could be adjusted over the course of an emergency as traffic volumes change.
Please send KN6PE any comments or insights on how this feature works in your environment.
INTRODUCTION
Most BBSs have one or more commands that take a mask to selectively list Bulletin messages
off of the BBS. Usually, the intent of using this mask is to sift through a large number of Bulletins to retrieve only those of interest that match the mask.
HOW TO
To set up retrieving selected bulletins, do the following:
- Determine the BBS Selective Retrieve Command.
From the Outpost Interactive Packet Window (Tools > Interactive Packet), connect, and manually log on to the BBS. Enter "?" or "h" to generate a list of commands.
EXAMPLE...
ENTER COMMAND: B,J,K,L,R,S, or Help_>
help
B(ye) PBBS WILL DISCONNECT
:
L <|> call LIST MESSAGES FROM OR TO CALL
LB LIST BULLETINS
LC [cat] LIST CATEGORIES
LL n LIST LAST n MESSAGES
LM(ine) LIST UNREAD MESSAGES ADDRESSED TO YOU
LO [+|-] LISTING ORDER
LT LIST TRAFFIC
:
ENTER COMMAND: B,J,K,L,R,S, or Help_>
In this example, the command of interest is the L> (List to-call) command. Other BBSs may show a
L [category] command.
- Determine the list of current categories.
In the above example, there is a List Categories command (LC [cat]). enter this command to see the possible mask opportunities on the BBS.
EXAMPLE...
ENTER COMMAND: B,J,K,L,R,S, or Help_>
lc
WX ALLEOC LINUX KEPS
ENTER COMMAND: B,J,K,L,R,S, or Help_>
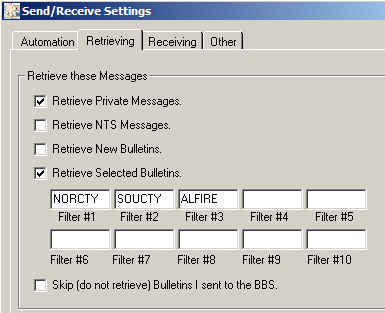
There are 4 categories listed above. There may be other categories that your Operational Area will establish for emergency use, such as NORCTY (North County), SOUCTY (South County), ALFIRE (All Fire Stations), etc. These should be agreed to and communicated prior to or during the event.
 Log off the BBS.
- Set up Outpost.
From the Outpost main, select Tools > Send/Receive Settings, then Tab 2.
-
Check the "Retrieve Selected Messages" option.
-
Enter up to 10 masks in the filter mask fields.
-
Press OK when done.
- Initiate a Send/Receive Session.
Press Send/Receive. Only bulletins that match the defined filters will be retrieved.
COMMENTS ABOUT SELECTIVE BULLETINS
To take advantage of this feature, you need bulletins sent to these
categories. This is done by creating messages and sending it TO: "NORCTY"
or "ALFIRE", or whatever message category is. Then, set the message
type as Bulletin. See Creating a Message for
details on setting this option. This feature is best used when there
is a plan for message types set up ahead of time.
INTRODUCTION
The text of the message can also originate from a text file created using
Notepad, Wordpad, MS-Word, or any other text processor that can create a
.txt file. To import a message from a text file, do the following:
HOW TO
- From the main Outpost Window, click on the
New button.
- Select File > Open. Navigate to the directory where the file resides and select the file.
- Press OK. The text will be loaded into the Message area.
- The name of the file will be written into the Subject line.
COMMENTS ABOUT SENDING A TEXT FILE
The reverse process can also occur at the receiving station. One the
receiving end, once the message is received, the user can select File >
Save As. The file name will default to the message's subject.
Then, all you need to do is select the directory where you want the file to
be written.
INTRODUCTION
There are times that a message needs to be sent that is urgent in
nature. Outpost allows you to mark a message as urgent so that,
at the receiving station, it is clearly identified as a message that
needs immediate attention.
HOW TO
To send a message as URGENT, proceed as follows:
1. Begin to create a message as usual; from the Outpost main menu, press NEW.
2. Press the Urg Button located on the upper right portion of the message form. The Message Type line (highlighted in Yellow below the buttons) will show that this message will be sent as an Urgent message.
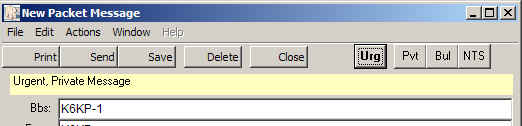
3. Press the Urg Button again to make the message non-urgent.
4. Press Send when done.
The message entry will be highlighted in RED in the Out Tray at the originating station, and in RED in the In Tray at the receiving station.
INTRODUCTION
BBS Setup is required to describe the specific aspects of the BBS about
which Outpost needs to know. Specifically, the following 4 things need to be defined:
- Connect Name. This is the name that you would typically enter in a manual session to connect
to a BBS. Typical names could be KN6PE-1, W6SJC-1, and W6EW-10.
The connect name is entered on the 1st tab of the BBS Setup screen.
- BBS Prompts. Outpost needs to know when it should send a BBS command to the BBS. To do this, it
will look for BBS Prompts that are returned by the BBS. As of v2.2, Outpost can automatically identify the BBS Prompt for almost all BBSs currently in production. Four options are available to the user to identify the BBS type:
(1) Let Outpost determine the BBS and set up the Prompts
(2) User defines the BBS prompts
(3) AA4RE BBS (a non-identifying BBS)
(4) AA4RE BBS with Tactical Call Option (Santa Clara County RACES only)
In almost all cases, Option (1) should be selected.
- BBS Commands. Almost all BBSs use the same command set for sending, listing, reading, and deleting messages. Outpost populates the
BBS commands with a default set. However they can be changed if your situation is different.
- BBS Path. This describes the means to get to this BBS, either (i) direct, (ii) using a digipeater, or
(iii) using KA- or Netrom nodes.
BEFORE YOU BEGIN
Other than entering the BBS connect name, the extent of the setup is determining the access path to the BBS and all permissions are set up for you at that BBS.
- If you are using one or more digipeat stations, record the stations and order in which you entered
them on the command line to get to the BBS
- If you are using one or more KA- or netrom nodes, see the HOW-TO on KA-Node/Netrom Access and the Application Note Setting up KA-Node/Netrom Network Access for details.
HOW TO
To set up a BBS, proceed as follows:
- Manually connect to the BBS. Note the connect name (i.e.: W6XSC-1)
- Some BBS require that you to register when you connect for the first time. If you do not, you may be prompted every time you connect... and Outpost will not like that.
- Turn on Expert Mode and turn off any features intended for scrolling terminals, such as "pause every 20 lines". Each BBS is different. If you cannot find the switches, check the Outpost troubleshooting page, or post a question to the Outpost User Group for help
(http://groups.yahoo.com/group/OutpostPacket/)
NOTE: if you do not get this far, STOP!!! Contact your BBS sysop for assistance.
Once you have confirmed you can manually connect to the BBS, proceed as follows:
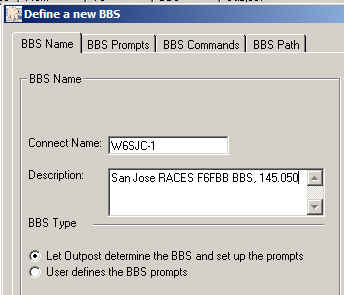 From Outpost, select Setup > BBS, Tab 1
Enter the connect Name
Enter a description (optional)
BBS Type defaults to the 1st choice
(Let Outpost determine...)
- From Outpost, select Setup > BBS, Tab 3
No changed required for this tab because of the BBS Type selection made.
- From Outpost, select Setup > BBS, Tab 4
The default option is is Direct (your station directly connects to the BBS). If you are using a Digipeater, check that box, and list the digipeat stations separated by commas. For KA or Netrom node access, see the HOW-TO on KA-Node/Netrom Access for details.
- Press OK.
- Set up the TNC (see that HOW TO on
Setting up a TNC)
- Set up retrieve options: Tools > Send/Receive
Settings, Tab 2.
- At this point, Outpost should be able ready to go. Press Send/Receive and confirm that Outpost connects, sends any outgoing messages, retrieves any messages addressed to you, and then exits.
Setting up a BBS, Santa Clara County RACES
INTRODUCTION
BBS Setup is required to describe specific aspects of the BBS that Outpost needs to know about. For Santa Clara County RACES, a custom version of the AA4RE BBS exists that requires a slightly different setup step. This HOW TO describes that difference.
HOW TO
To set up for the Santa Clara County RACES W6XSC-1 BBS, proceed as follows:
 Review the message titled... "HOW TO: Setting up a BBS"
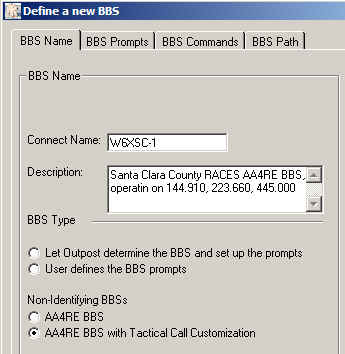
- From Outpost, select Setup > BBS, Tab 1
- Enter the connect Name = W6XSC-1
- Enter a description (optional)
- Set the BBS Type to "AA4RE BBS with Tactical Call Customization"
- From Outpost, select Setup > BBS, Tab 3
Leave these as the defaults.
- From Outpost, select Setup > BBS, Tab 4
The default option is is Direct (your station directly connects to the BBS). If you are using a Digipeater, check that box, and list the digipeat stations separated by commas. For KA or Netrom node access, see the HOW-TO on KA-Node/Netrom Access for details.
- Press OK.
- Outpost will then bring up the Setup
> Identification form.
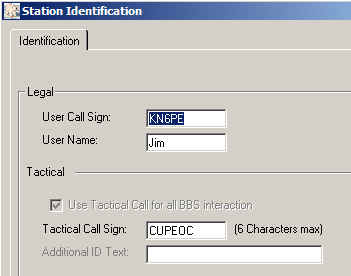 - Confirm or enter your FCC call sign and your name.
- Enter your City's Tactical Call. See your Emergency Coordinator for details.
- Press OK
- Set up the TNC (see that HOW TO on
Setting up a TNC)
- Set up retrieve options: Tools > Send/Receive
Settings, Tab 2.
- Check "Retrieve Private Messages"
- Check "Retrieve New Bulletins"
- At this point, you should be able ready to connect to the County BBS. Press Send/Receive and confirm that Outpost connects, sends any outgoing messages, retrieves any messages addressed to you, and then exits.
INTRODUCTION
TNC Setup refers to setting up one of the 3 device types that Outpost supports:
- a direct connected TNC (Serial or USB Port, described here)
- an AGWPE device (see Setting up AGWPE Access)
- Telnet access (see Setting up Telnet Access)
Almost all TNCs (not to be confused with the behavior or the Personal BBS feature) work the same. The extent of any configuration changes is identifying the Comm Port settings needed to talk to the TNC.
NOTE: More recently, laptops and PCs are being delivered without Serial Ports. USB-to-Serial Port adaptors work fine with Outpost. However, if you do use a USB-to-Serial Port adaptor, watch the Comm Port number that is assigned to the USB port.
BEFORE YOU BEGIN
To get the port configuration right, having the TNC manual available is a MUST. Before doing any setup in Outpost, be sure you can talk to
the TNC with some other terminal emulator program, such as Outpost's Interactive Packet Terminal
(Serial version), Hyperterm, or Pacterm.
HOW TO
To set up a TNC, proceed as follows:
- Depending on the TNC, there may be soft configuration settings or dip switches that need to be set. You need
to know 4 things:
Baud Rate: the speed the TNC will talk to the PC (not the radio)
Data Bits: number of bits to be passed, usually 7 or 8
Parity: None, Mark, Space, Even, or Odd
Stop Bits: 1, 1.5, or 2
The 2 typical combinations used are: 9600-8-N-1 and 9600-7-E-1. Kantronics generally defaults to 9600-8-N-1, whereas the PK- and MFJ- TNCs seem to default to the 9600-7-E-1 settings. Double check your manual to be sure.
- Ensure the TNC is cabled to the PC. Turn on your terminal emulator program.
Check the program's comm port settings. Turn on your TNC. If all is working well, you will see the TNC's start-up message listing the TNC, the firmware version, and possibly other information. The TNC Prompt will be the last thing displayed, and is usually
"cmd:".
- If you did not get the above message, or you received garbled characters, there's a problem with one of the above settings. STOP! do not continue without resolving this.
- If you received a readable TNC start-up message, you are ready to configure Outpost.
- From Outpost, select Setup > TNC, Tab 1
Enter the TNC Name (a friendly name, like KPC3, PK-88, etc)
Enter a description (optional)
Ensure Device Type as checked as "TNC"
- From Outpost, select Setup > TNC, Tab 4
Set the Comm Port #, Baud Rate, Data Bits, Parity, and Stop Bits
Leave Echo set to ON (default, REQUIRED).
Leave Flow Control set to RTS/CTS (default, STRONGLY RECOMMENDED).
- Press OK.
- Set up the BBS (see that HOW TO:
Setting up a BBS)
- Set up retrieve options: Tools > Send/Receive
Settings, Tab 2.
- At this point, Outpost should be able ready to go. Press Send/Receive and confirm that Outpost connects, sends any outgoing messages, retrieves any messages addressed to you, and then exits.
INTRODUCTION
Outpost version 2.0 includes the first implementation of AGWPE support. Testing
was performed exclusively with AGWPE version 2003.308 using a KPC-3, indicating that the basic connection between Outpost and AGWPE works.
AGWPE is a major subject within itself, and my intent is not to replicate the excellent information and documentation that already exists on the Web. However, depending on the questions I get, an Application Note may be developed exclusively focusing on AGWPE-Outpost interoperability.
NOTE: IF YOU ARE NOT FAMILIAR WITH AGWPE, DO NOT ATTEMPT TO USE OUTPOST WITH AGWPE WITHOUT SPENDING SOME TIME LEARNING THAT APPLICATION.
Having said that, once you figure out AGWPE and have it up and running, you can take advantage of your PC's sound card and implement Sound Card Packet. Here are two references that you should definitely check out to get up to speed with AGWPE:
- Full product information from George SV2AGW, the author of AGWPE, and where you can find the free Ham Radio AGWPE download…
http://www.sv2agw.com/
- Ralph KC2RLM's site is also an excellent reference on AGWPE in general, and sound card packet in particular… http://www.kc2rlm.info/soundcardpacket/
BEFORE YOU BEGIN
You need the following information and make the following decisions on your AGWPE implementation:
- AGWPE downloaded and installed on your local machine
vs. a remote machine on the same network.
- A decision on the device with which AGWPE will communicate: TNC or sound card. See KC2RLM's site above for getting sound card packet up and running.
NOTE: For this HOW-TO, I am assuming that AGWPE and Outpost are running on the same PC. However, AGWPE and Outpost can be on 2 different PCs and can work together PROVIDED they can access each other by a network connection.
NOTE: PC networking is not covered in this HOW-TO.
HOW TO
To use AGWPE, proceed as follows:
- Complete steps 1 and 2 above.
- Configure AGWPE to work with your selected device. The following are the AGWPE defaults and information you will be needed by Outpost:
Remote Host, defaults to 127.0.0.1
Remote Port, defaults to 8000
Radio Port, defaults to 1, the first port configured.
If you change any of these settings, make a note.
- Test the basic connection. From Outpost Main Menu,
Tools > Interactive Packet > AGW Packet Engine. This runs the program
Ipagwpe.exe, the "AGWPE Interactive Packet for Outpost" program, a program from which you can manually check and confirm that AGWPE is
installed and set up correctly.
- From the Ipagwpe.exe program, select File > AGWPE
Settings. All initial values are defaults that match the initial AGWPE Setup above. If in doubt, press the "Defaults" button to restore the default settings. Set the Network timeout to 5000 msec. Press OK when done.
- Verify AGWPE is running. From the Ipagwpe.exe program, press the
Connect button. The program will check for and connect to AGWPE, then prompt for your call sign. After entering your call sign, your call is registered with AGWPE. Note any errors during this process.
- Next, you will be prompted for the BBS to which you want to connect. Enter the BBS connect name (i.e.: KN6PE-1, W6SJC-1, etc.). At that point, you should see or hear that a connection is in progress. If successful, you will be connected to the BBS.
NOTE: if you do not get this far, STOP!!! Either AGWPE or Ipagwpe.exe is not configured correctly, or the BBS is not accessible. Do not proceed with an Outpost session until you figure out the problem. You will be making similar settings when configuring Outpost.
- When done, enter B(Bye), then press Disconnect. Exit from the program.
- Set up Outpost. First, select Outpost Main Menu,
Setup > TNC. Press New, and set the device type to be
AGWPE. The AGWPE tab is enabled and all other tabs are disabled. From the information gathered above, enter the setup information into the fields. See the user guide for more details. Press
OK when done.
- Next, set up the BBS (Outpost Main Menu,
select Setup
> BBS) if it is not already set up. The settings made here are the same as for regular TNC access to the BBS.
- At this point, Outpost should be able ready to go. Press Send/Receive and confirm Outpost connects, sends any outgoing messages, retrieves any messages addressed to you, and then exits.
IMPLEMENTATION NOTES
1. The Outpost implementation of AGWPE has been tested on the Kantronics PBBS, AA4RE BBS, F6FBB BBS, and MSYS BBS Software. They all worked consistently except for the MSYS. This could be my specific garage implementation, and would appreciate any feedback on your experiences.
2. Before deploying Outpost with AGWPE into your operations, I recommend a thorough checkout period for you to understand how the 2 applications work together, note any particularities (and let me know!), and build general familiarity with this new capability.
INTRODUCTION
Why Telnet in Outpost? There are some emergency communications teams
that have a BBSs that is accessible in a networked environment by radio operators at the EOC. In
these cases, EOC Radio Operations can have direct access to the BBS by a wired network and telnet connection without dedicating a radio to that function.
Implementing a telnet connection between Outpost and the BBS requires several things:
- A physical network connection between your Outpost PC and the BBS. This can
be either direct or indirect through a local area network or common router.
- Networking enabled on both PCs. Someone who understands network systems administration will be invaluable here and reduce hours if not days of frustration. Be sure you can confirm that your networking is working on each PC prior to moving on to getting the applications to work.
- A configured BBS with Telnet support turned on.
- A logon and password on the BBS to which Outpost can connect.
- Outpost configured for telnet access.
BEFORE YOU BEGIN
You need the following information to be provided by your BBS or network administrator.
- Remote Host name: either an IP address or network path name.
- Remote Port number: this is usually a 4 digit number.
- Your logon name: typically your call sign.
- Your password: to be set up by the BBS sys admin.
- The Logon Prompt: the string that the BBS presents for you to enter the logon name
- The Password Prompt: the string that the BBS presents for you to enter the password
HOW TO
To use Telnet, proceed as follows:
- Complete steps 1 through 5 above. Do not proceed without confirming these steps work.
- Collect the information stated above.
- Check out the basic connection. From Outpost Main Menu,
select
Tools > Interactive Packet > Telnet. This opens the "Telnet Interactive Packet for Outpost" program, a telnet terminal from which you can check out and confirm that telnet works.
- In the Telnet program, select File
> Telnet Settings. Enter the Remote Host name, and Remote Port. Set the Network timeout to 5000. Press
OK when done.
- In the Telnet program, press the Connect Button. The program will connect to the named host and present the
call sign Logon. Enter your call sign (logon), press enter. Then enter your password when prompted. You should now be logged on the BBS.
NOTE: if you do not get this far, STOP!!! Contact your BBS or network administrator for assistance.
- When done, enter B (Bye), then press Disconnect. Exit from the program.
- Set up Outpost. First, select Outpost Main Menu,
select
Setup > TNC. Press New, and set the device type to be Telnet. The Telnet tab is enabled
and all other tabs are disabled. From the information gathered above, enter the setup information into the fields. See the user guide for more details. Press
OK when done.
- Next, set up the BBS (Outpost Main Menu,
select Setup
> BBS) if not already set up. Make sure the BBS Prompt for Telnet is the same as for a radio-based connection.
- At this point, Outpost should be able ready to go. Press Send/Receive and confirm that Outpost connects, sends any outgoing messages, retrieves any messages addressed to you, and then exits.
IMPLEMENTATION NOTES
1. Before deploying Outpost with Telnet into your operations, I recommend a
thorough checkout period for you to understand how the 2 applications work together, note any particularities (and let me know!), and build general familiarity with this new capability.
2. One change you may need to be made is with the F6FBB telnet setup. Bill VE7QC reported that the following change corrected a problem with "stuck packets" where the BBS prompt was not being displayed for large files retrieved by Outpost. In the port.sys file, change the MaxFrame parameter from 7 (in Bill's case) to 1 if you experience this problem...
Before:
# Same number of lines as number of TNCs.
#
#TNC NbCh Com MultCh Pacln Maxfr NbFwd MxBloc M/P-Fwd Mode Freq
6 4 2 t1
250 7 2 20
10/60 UTYW Telnet
After:
#TNC NbCh Com MultCh Pacln Maxfr NbFwd MxBloc M/P-Fwd Mode Freq
6 4 2 t1
250 1 2 20
10/60 UTYW Telnet
Signature, adding to a message
INTRODUCTION
Being able to generate and send messages as efficiently as possible is an implied requirement of packet and Outpost. The Signature feature allows the user to define one or more lines of signature text (name, title, organization, phone, etc.) and optionally turn it on for insertion into a new message.
Then, when a new message is created, the signature text is inserted a few lines below the start of the message. The user can then enter the
balance of the message above it.
Signatures are tied to the Call Sign of the user, with each user having a different signature defined.
HOW TO
To use Signatures, proceed as follows:
- From the Outpost Main Menu, select Tools
> Message Settings.
- On the first tab, check the "Insert a signature for..." box
- Enter the text in the signature box.
- Press OK when done.
NOTES
There is no limit to the size and number of lines allowed. However, every additional character adds to the channel utilization. In short, the signature should be as succinct as possible.
INTRODUCTION
Amateur Radio voice nets have used tactical call signs for years. However, the flexibility of Tactical Calls has been elusive in the packet radio world due to a variety of limitations and constraints. Ideally, Tactical Call support should be implemented at the BBS. However, it appears that all out-of-the-box BBSs do not explicitly support the use of Tactical Calls. Outpost implements Tactical Calls on the Outpost (client) side.
For tactical calls to work, 2 requirements must be met:
- The tactical call sign must be perceived as sufficiently valid by the BBS. Many BBSs perform some rudimentary level of call sign checking for connecting stations.
- The packet station implementing tactical calls must correctly identify with its legal call sign per their local legal rules.
Given the current BBS designs, the approach for using Tactical Calls is essentially to find and adopt a call sign structure that satisfies the BBS' call sign checking logic while still making sense in your organization. For instance, through limited experimentation with the F6FBB BBS and KPC-3 PBBS, one valid BBS call sign format that could be used as a tactical call is as follows:
#xxxxx, where:
# is a number.
xxxxx is any combinations of 5 letters.
EXAMPLE
The best way to understand Tactical Calls is to look at an example. In Santa Clara County, the County Hospital system is implementing a packet network for its 11 regional hospitals using the F6FBB BBS as its packet mail drop. These hospitals
are being assigned a tactical call with the structure described above. For instance:
1MVECH - Mountain View El Camino Hospital
1PASMC - Palo Alto Stanford Medical Center
1SJVMC - San Jose Valley Medical Center
1SJGSH - San Jose Good Samaritan Hospital
For the Hospital system, the basic tactical call format that is used is:
1 CC HHH
\ \ \___3 letter
abbreviation for the hospital name
\ \_____2 letters
for the city in which the hospital is located
\______the
number "1"; arbitrary, satisfies the BBS's need to see a digit
HOW TO
To use Tactical Calls, proceed as follows:
- What does your BBS support? Determine a tactical call structure. Whereas F6FBB and KPC3 PBBS' support the example above, not all BBS's are the same. From the Outpost,
select
Tools > Interactive Packet or some other packet program (Hyperterm?), set the TNC
"mycall" to your test "tactical call".
- Connect to the BBS. At this point,
you are connecting with your tactical call and not your legal call sign. Verify that the BBS accepts the call sign. If the connect is successful, register the Tactical Call with the BBS if you are prompted.
- Try sending yourself a message (round trip). If successful, you have a valid tactical call format.
- OK, we're ready to configure Outpost. From the main menu, select Setup
> Identification.
Check the "Use Tactical Call... " box.
- Enter your Tactical Call in the "Tactical Call" field.
- Fill in the "ID Text String". This will be part of the transmitted legal identification String. For instance, if your Tactical Call is "1CUEOC", your FCC call is "KN6PE", and
you set the ID string is "Cupertino EOC", the following string will be transmitted as your legal ID at the end of your Send/Receive Session:
de StationID=KN6PE, TacticalCall=1CUEOC, Cupertino EOC
- When done, press OK. Note that your tactical call is listed in your status line at the bottom of the Outpost main window.
- At this point, when you start a new message, it will open with 1CUEOC set as the From address. When connecting to the BBS, Outpost will look for messages addressed to 1CUEOC.
- To turn off Tactical Calls, go to Setup > Identification, and uncheck the "Use Tactical Call... " box. All subsequent message and BBS processing will occur with your legal call sign.
IS IT LEGAL?
Stations that identify with a tactical call must also identify with their legally assigned call sign.
In the United States, the FCC addresses the subject of station identification in Part 97.119, and states that each amateur station “… must transmit its assigned call sign on its transmitting channel at the end of each communication, and at least every 10 minutes during a communication, for the purpose of clearly making the source of the transmissions from the station known to those receiving the transmission.
No station may transmit unidentified communications or signals, or transmit as the station call sign, any call sign not authorized to the station.”
NOTE: The AX.25 is the underlying protocol that makes packet work. The AX.25 Link-Layer Protocol Specification complies with the X.25 specification with the exception of:
- an extended address field, and
- the addition of an Unnumbered Information (UI) Frame.
The extended address field of every frame is encoded with the station of origin and destination amateur call signs. In short, under typical use, every time an AX.25 packet is transmitted, it essentially identifies the transmitting station and satisfies the requirements of Federal Communications Commission (FCC) Part 97.119. For more information, see: AX.25 Amateur Packet-Radio Link-Layer Protocol document found at http://www.tapr.org/pub_ax25.html.
To summarize, the three points to reiterate:
- Under FCC rules, station identification must occur at the end of each communication, and at least every 10 minutes during a communication.
- The FCC rules do not state that the expanded AX.25 address field with embedded Call Sign is required for packet station identification. While the AX.25 implementation satisfies the requirement, this is not the only method that the requirement could be met.
- Outpost satisfies the requirement for legal station identification by transmitting the user's valid station call sign at the end of each Send/Receive session (see Step 6 in the HOW-TO above).
OTHER
NOTES
The above is one example. Some TNC PBBS will accept a 6 character tactical
call without the use of any digits. Other BBSs may not be so easily
fooled and attempt to thoroughly validate the Tactical Call as a valid call
sign. The true limitation of Tactical Calls lies with how the BBS was
actually implemented.
Tactical Calls should not be used at all with Telpac/Winlink.
General Feedback
Please send any feedback to
updated: May 08, 2008