
Outpost Packet Message Manager
HOW-TO... Setting up a BBS
Setting up a BBS
INTRODUCTION
BBS Setup is required to describe the specific aspects of the BBS about
which Outpost needs to know. Specifically, the following 4 things need to be defined:
- Connect Name. This is the name that you would typically enter in a manual session to connect
to a BBS. Typical names could be KN6PE-1, W6SJC-1, and W6EW-10.
The connect name is entered on the 1st tab of the BBS Setup screen.
- BBS Prompts. Outpost needs to know when it should send a BBS command to the BBS. To do this, it
will look for BBS Prompts that are returned by the BBS. As of v2.2, Outpost can automatically identify the BBS Prompt for almost all BBSs currently in production. Four options are available to the user to identify the BBS type:
(1) Let Outpost determine the BBS and set up the Prompts (Default setting)
(2) User defines the BBS prompts
(3) AA4RE BBS (a non-identifying BBS)
(4) AA4RE BBS with Tactical Call Option (Santa Clara County RACES only)
In almost all cases, Option (1) should be selected.
- BBS Commands. Almost all BBSs use the same command set for sending, listing, reading, and deleting messages. Outpost populates the
BBS commands with a default set. However they can be changed if your situation is different.
- BBS Path. This describes the means to get to this BBS, either (i) direct, (ii) using a digipeater, or
(iii) using KA- or Netrom nodes.
BEFORE YOU BEGIN
Other than entering the BBS connect name, the extent of the setup is determining the access path to the BBS and all permissions are set up for you at that BBS.
- If you are using one or more digipeat stations, record the stations and order in which you entered
them on the command line to get to the BBS
- If you are using one or more KA- or netrom nodes, see the HOW-TO on KA-Node/Netrom Access and the Application Note Setting up KA-Node/Netrom Network Access for details.
HOW TO
To set up a BBS, proceed as follows:
- Manually connect to the BBS. Note the connect name (i.e.: W6XSC-1)
- Some BBS require that you to register when you connect for the first time. If you do not, you may be prompted every time you connect... and Outpost will not like that.
- Turn on Expert Mode and Turn off
paging, a features intended for scrolling terminals, such as "pause every 20 lines". Each BBS is different. If you cannot find the switches, check the Outpost troubleshooting page, or post a question to the Outpost User Group for help
(http://groups.yahoo.com/group/OutpostPacket/)
NOTE: if you do not get this far, STOP!!! Contact your BBS sysop for assistance.
Once you have confirmed you can manually connect to the BBS, proceed as follows:
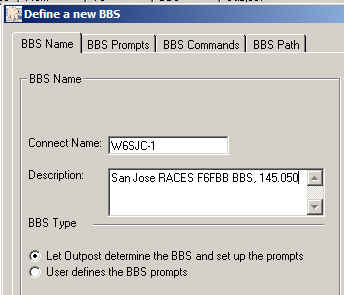 From Outpost, select Setup > BBS, Tab 1
Enter the connect Name
Enter a description (optional)
BBS Type defaults to the 1st choice
(Let Outpost determine...)
- From Outpost, select Setup > BBS, Tab 3
No changed required for this tab because of the BBS Type selection made.
- From Outpost, select Setup > BBS, Tab 4
The default option is is Direct (your station directly connects to the BBS). If you are using a Digipeater, check that box, and list the digipeat stations separated by commas. For KA or Netrom node access, see the HOW-TO on KA-Node/Netrom Access for details.
- Press OK.
- Set up the TNC (see that HOW TO on Setting up a TNC)
- Set up retrieve options: Tools > Send/Receive
Settings, Tab 2.
- At this point, Outpost should be able ready to go. Press Send/Receive and confirm that Outpost connects, sends any outgoing messages, retrieves any messages addressed to you, and then exits.
General Feedback
Please send any feedback to
updated: October 12, 2008